Fiskar
Tutorial

Your first app, from the phone.

About 15 minutes to set up, then everything happens on the phone. The examples use "Crumb & Co", a bakery pre-order app, which is also what Demo mode shows.

0

What you need

Fiskar is the phone half. The work happens on your own Mac, so you need both.

An Android phone

Android 10 or later.

A Mac with Claude Code

Signed in with your Claude plan. Pro is enough. Fiskar adds no cost on top.

Tailscale

Free. On the phone and the Mac, signed in to the same account. It's the private link between them.

A GitHub account

Free. Your apps and their releases live in your own private repos.
1

Install Fiskar

Fiskar is in early beta. Join the waitlist and we'll email you an invite with the repository address. Beta versions are shared as an APK through GitHub releases.

  1. Install Obtainium, a free app that installs and updates apps straight from GitHub.
  2. In Obtainium, tap Add App and paste the Fiskar repository address from your beta invite.
  3. Tap Install. Android asks once to allow installs from Obtainium. Allow it and go back.

From now on, Obtainium tells you when a new version of Fiskar is out.

Rather not use Obtainium? Download the latest .apk from the releases page on your phone and open it. You'll have to do that again for each update.

2

Try Demo mode

Fiskar starts in Demo mode: a pretend Mac with the Crumb & Co sample app. Everything works, nothing is real, and nothing touches your Mac. It's the quickest way to learn the five tabs.

  • Home: your apps, a new app, the live view and approvals.
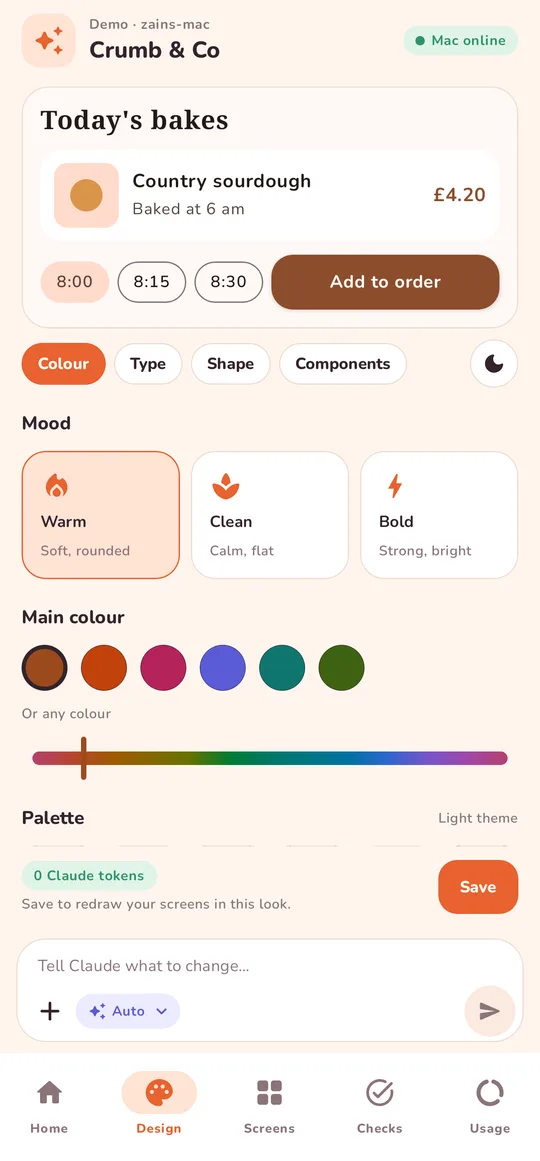
  • Design: mood, colour, fonts and the component gallery.
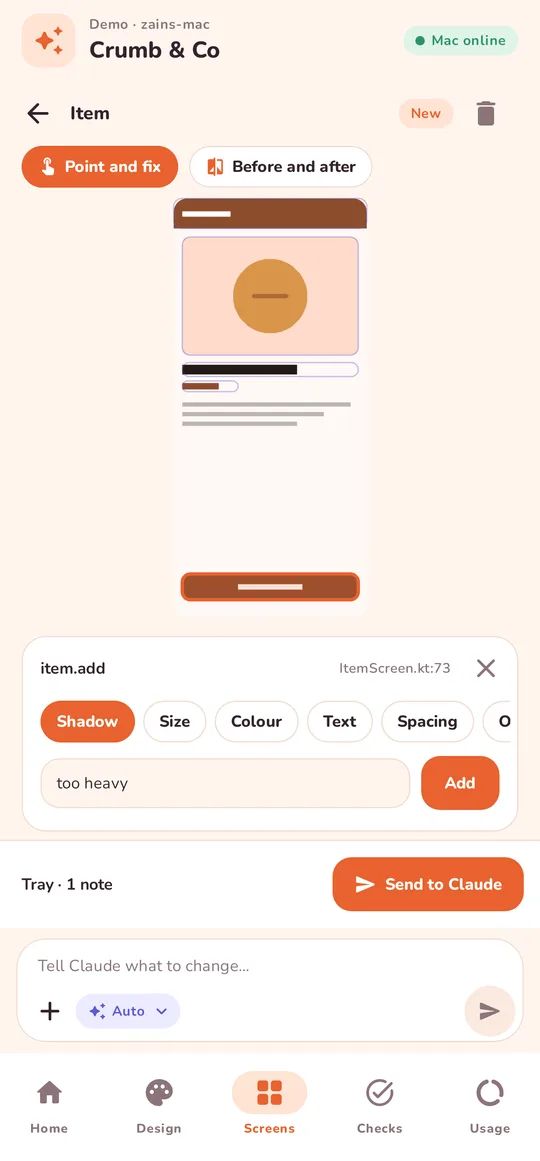
  • Screens: previews of every screen, point and fix.
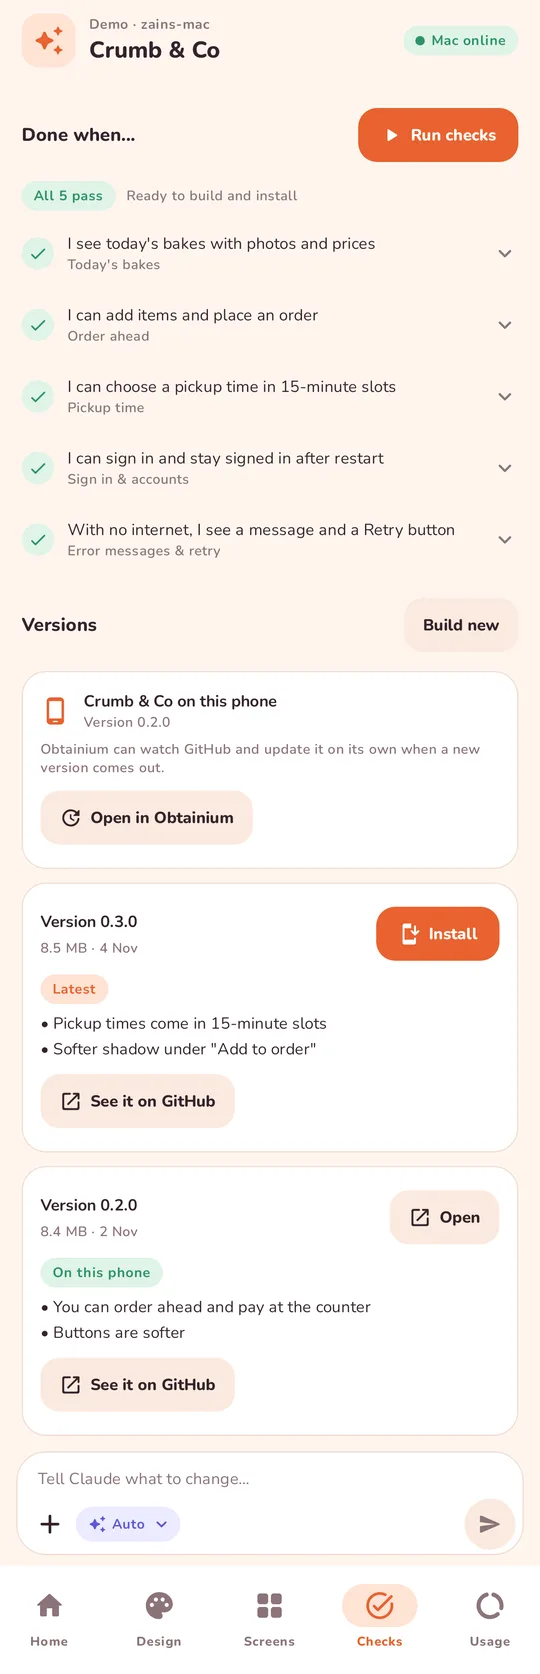
  • Checks: checks, builds and install.
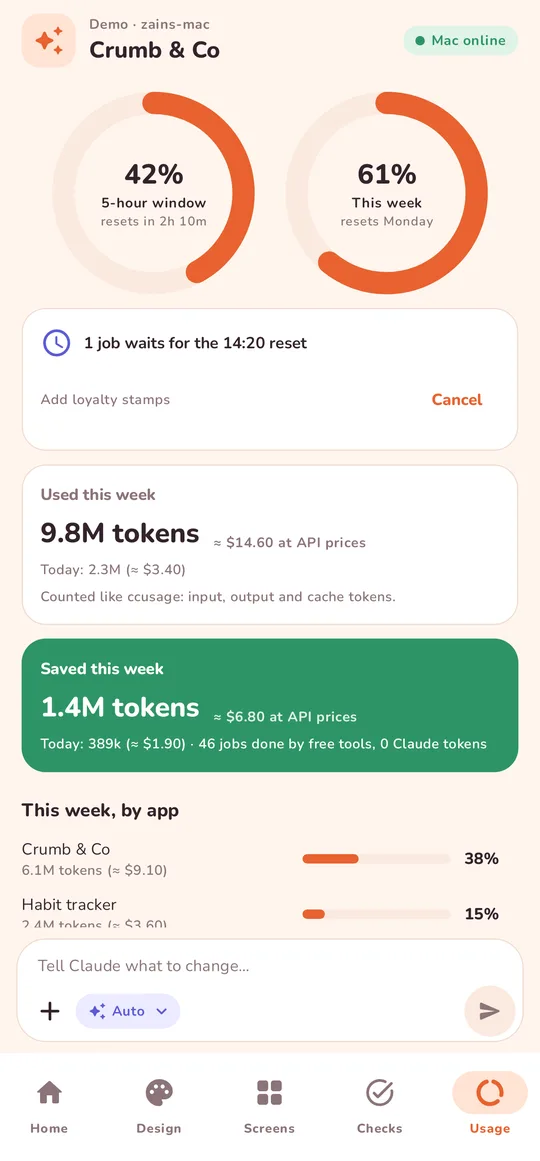
  • Usage: what you used, what you saved, which model does what.

The pill at the top right always shows the state: Mac online, Claude working, Needs you or Mac offline. Tap it to open Your Mac.

Home in Demo mode
3

Pair your Mac

  1. Install Tailscale on the Mac and the phone and sign in to the same account on both.
  2. On the Mac, start the Fiskar bridge with the one setup command from your beta invite. It checks Claude Code and the Android tools, then shows a QR code.
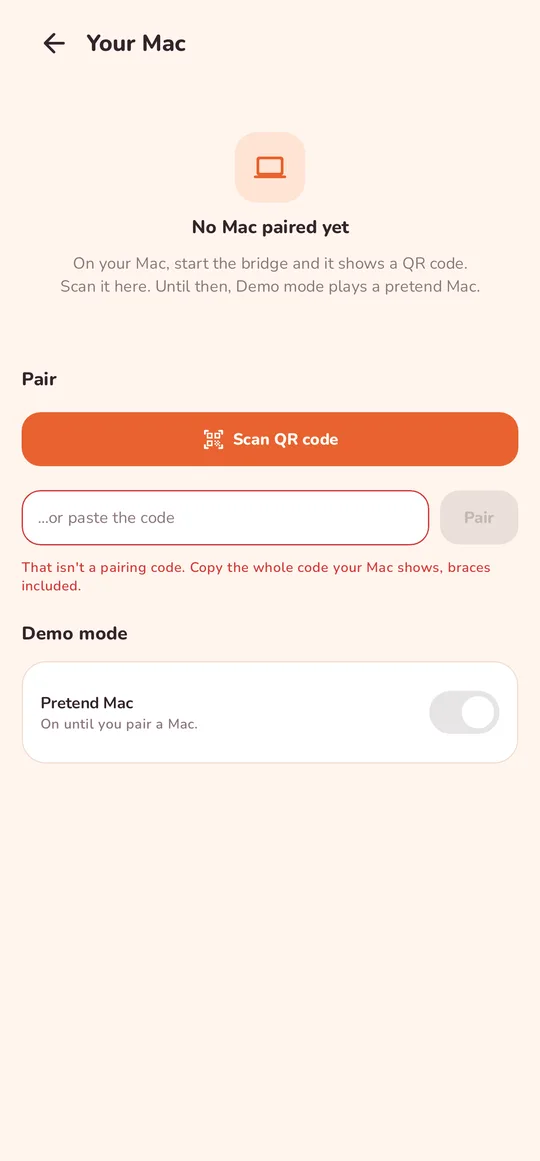
  3. On the phone, tap the status pill to open Your Mac, then Scan QR code. No camera? Use Pair and paste the code instead.

When it's done, Your Mac shows Connected, Claude signed in and Android tools ready, and Demo mode switches off by itself.

Private by design. The phone only ever talks to your Mac over Tailscale. Fiskar has no servers, and your code never leaves your Mac and your GitHub.

Your Mac screen before pairing
4

Describe your app

On Home, tap New app. Three short steps, mostly by tapping:

  1. Describe it. What kind of app, who it's for, and in a sentence what it does. Add screenshots of apps you like if you want: they help Claude match a look. Your answers become brief.md, written on the phone for free.
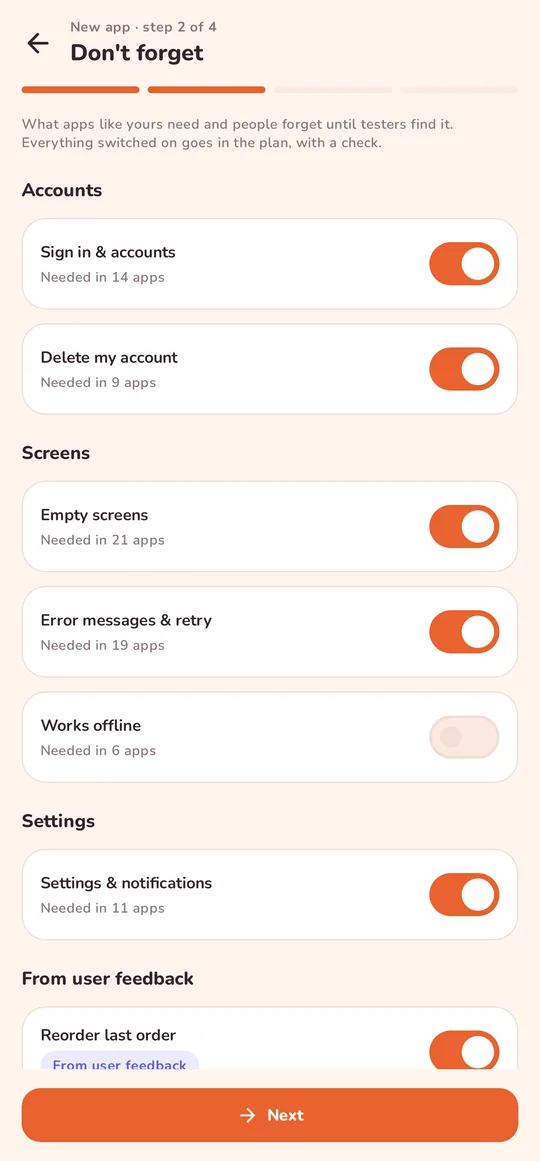
  2. Don't forget. What apps like yours need and people forget until testers find it: sign-in, empty screens, errors, offline, settings, account deletion. Tap an item to see why it matters. Everything switched on goes in the plan, with a check. Add your own at the bottom.
  3. What first. Feature cards marked Must, Nice or Later, each with a "Done when…" line, like Done when I can export my data. Claude builds the Musts first.

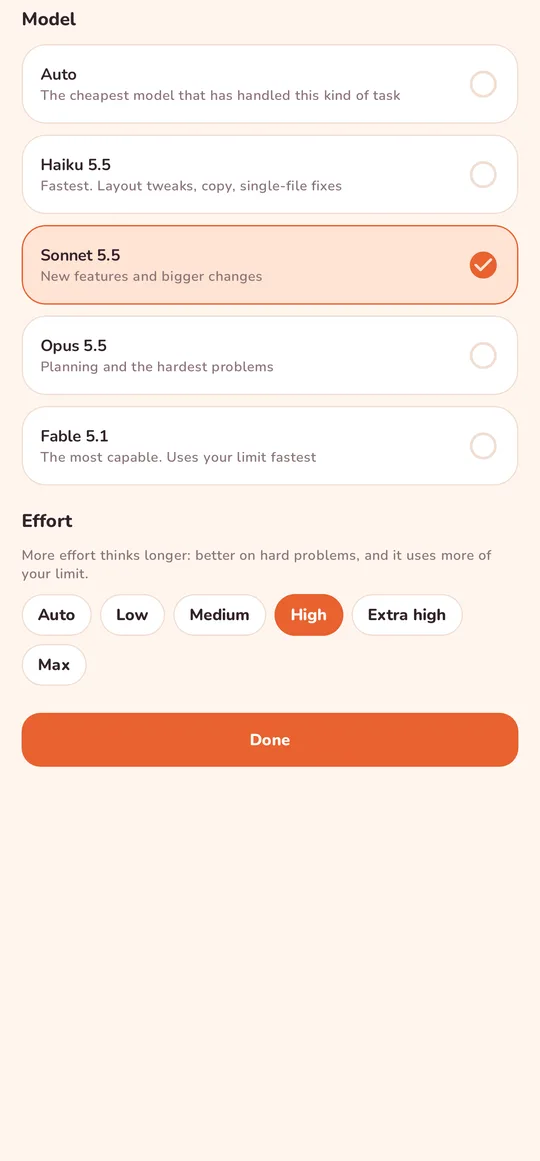
Check the model chip (for example Sonnet · High effort), then tap Start building. Your Mac creates the project, saves the brief, checklist and features, and Claude starts planning.

The Don't forget checklist
5

Watch it work and approve

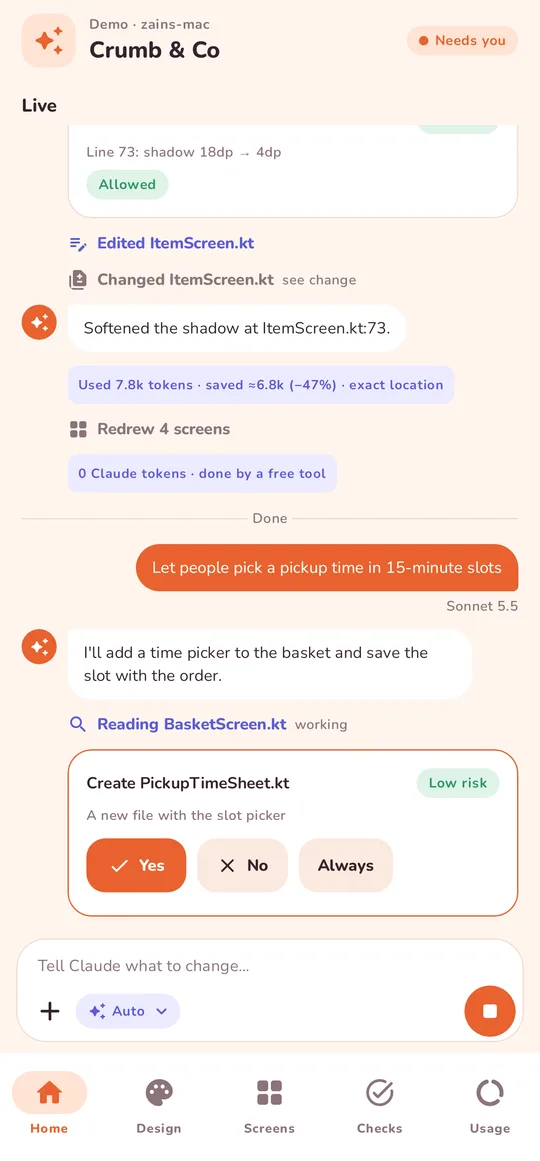
The Live view on Home shows each step as it happens: what Claude says, and short cards for what it did, like Changed ItemScreen.kt.

  • Approvals. Safe actions are pre-approved on your Mac. Anything else arrives as a card with Yes, No or Always, here and as a notification you can answer without opening the app.
  • Receipts. Under every finished step: what it used and what Fiskar saved, like used 5.7k · saved 18.7k · quiet build.
  • The message bar. Every screen has it: Tell Claude what to change…. Tap + to attach a photo or file, and the model chip to pick the model and effort. While Claude works, Stop takes the send button's place.
  • Out of signal? Messages wait and go as soon as your Mac is back. Nothing is lost or sent twice.
Choosing the model and effort
6

Files and changes

Open Files on Home to browse any file in the project: code with colours, images, and the references/ folder with your screenshots.

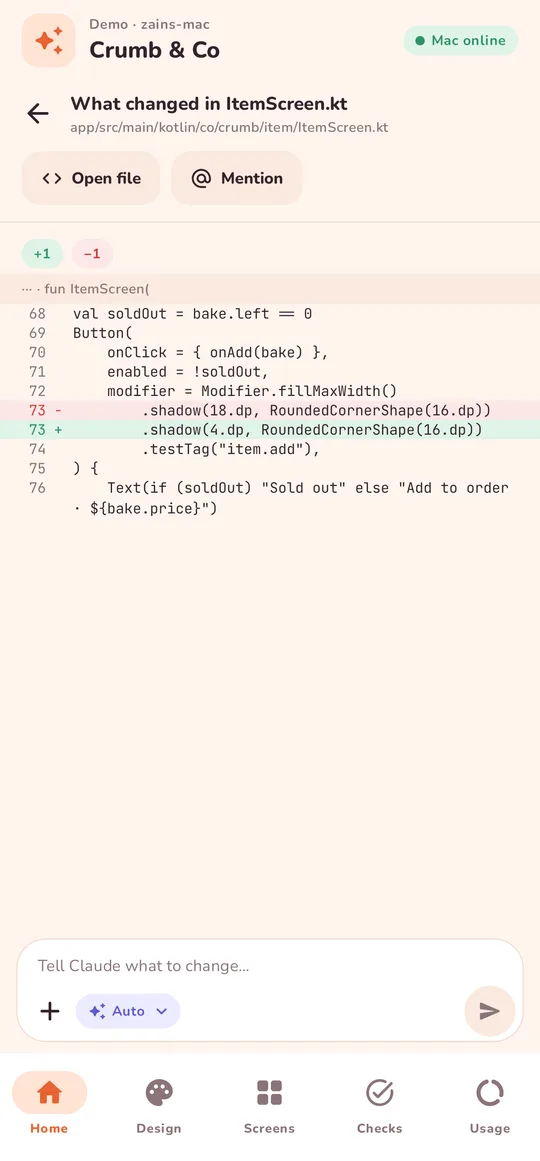
  • Tap a change in the live view to see exactly what a session changed, line by line.
  • Tap Mention on a file to put @path in your message, so Claude knows exactly which file you mean.
What a session changed in a file
7

Choose the look

On Design, every change previews instantly on the phone, at no AI cost.

  1. Pick a Mood: Soft and rounded, Calm and flat, or Strong and bright.
  2. Pick a Main colour, or any colour you like. The palette is worked out for light and dark. Tap Show the dark theme to check it.
  3. Choose fonts from Google Fonts, then corners, shadow and spacing.
  4. Tap Save. Your Mac updates the theme and redraws every screen, still without Claude.

Further down, the component gallery shows your app's real buttons, cards and fields in the saved look.

Mood and main colour
8

Point and fix

Screens fills up a few minutes after Claude starts building. Previews are drawn on your Mac and cost no Claude usage.

  1. Open a screen and tap anything that looks wrong, like the Add to order button.
  2. Choose what's off: Shadow, Size, Colour, Text, Spacing or Other, and add a few words: too heavy.
  3. Notes collect in the tray. Add more from other screens, then Send to Claude. One message for all of them uses less than one each.
  4. When the fix is in, drag the line to compare Before and after, then answer ✓ Good or ✗ Not yet.

Claude gets the exact file and line of what you tapped, so the fix lands in the right place the first time. Don't need a screen? Drop this screen.

Leaving a note on a tapped element
9

Check and install

  1. On Checks, each feature's "Done when" line is a check. Tap Run checks; your Mac runs them on the app.
  2. Tap Show what it saw for a screenshot of each check. If one fails, Ask Claude to fix sends the reason in one tap.
  3. When they all pass, tap Build new, then Install. Android asks once to allow installs from Fiskar; switch it on and come back.

Every version is also a GitHub release. Open in Obtainium keeps your app updated by itself, and you can share the release with testers.

All checks pass
10

Watch your usage

  • Rings for the 5-hour window and the week, with reset times, read from Claude Code's own logs.
  • By app and by feature, so you know what each part cost.
  • Saved today and this week, and how many jobs free tools did instead.
  • Right model for each job. Auto starts with the cheapest model and learns from your ✓ Good and ✗ Not yet answers. A job that failed on a cheaper model moves up one.

Close to the limit, Fiskar warns you, and new work waits for the reset instead of failing halfway.

The Usage tab
11

Tips for getting more done

  • Small and precise wins. "Make the Add to order shadow lighter" beats "the screen looks off". Pointing at it is even better.
  • Batch your fixes. Fill the tray, then send once.
  • Leave Auto on. Layout tweaks and copy changes rarely need the biggest model.
  • Answer ✓ Good / ✗ Not yet. It's how Auto learns which model to use next time.
  • Keep the checklist on. Every item you skip now is a round of fixes after testers find it.

Back to the overview